2.22.2013

Pillow Pop Project

I just HAVE to show off my new pillow! It came out great, even though I did have to improvise a bit. Neways, who cares about that! Here it is..


TADA! This baby makes me VERY Happy! Want to see the back? Of COURSE you do!..


LOVE this fabric :D. Now I did think it was pretty busy, but after going through almost every fabic I had in mind, this one stood out. I shared my process along the way on IG, Facebook, Flickr, and Twitter (on your left- Don't forget to follow me on your favorite Social Media Site ;D), but I'll share them again..


SO where did I come up with this gorgeous pattern? From Pillow Pop by Heather Bostic of .House. of A La Mode


It was the first project in the book, dubbed Fair Feathered friends by John Q. Adams of Quilt Dad. I'm still unsure as to whether or not I may be able to share a photo in the book, but  Lets' not tempt fate, yes?.


As you can see, I'm totally excited about all this sudden business of pillowee quilty making! SOo, I'm just going to end with photos of my new pillow. Enjoy, and my Thanks to Heather and John for an awesome project, as well as to all my followers for all of your awesome encouragement! ON with the Show..


Back Pillow is a Spider Web Block Pillow

<3,
Veronica

2.19.2013

4x5 Modern Quilting Bee

Well, I did it! I finished my very first Quilting Bee! It was pretty nerve wrecking for me. Mainly because I had put so much pressure on myself to choose ..well ANY thing for it. They all turned out fantastic in my opinion. Especially since this was a new block for me. Let me show you all a recap of my blocks! ..

My Test Block
 
For Ella

For Celine

For Allegorical

For Erica

For Eva-Marie

I can't wait for the rest of my blocks to come in, so that I can share them with you. Eek! Thank You So Much Ladies, and I really hope you enjoy your blocks!

If anyone wants any information on this Quilting Bee, I have a button to your left on my sidebar. I'm already stocking the group for my next entry ;D

<3,
Veronica

2.14.2013

Valentines Day Love


How long has it been since I've logged onto my blog?.. Since forever. I'm so terrible at blogging, or anything that requires a time frame/schedule. Especially since Samy, but secretly - and even more so - since getting my new iPhone 5. Not to long ago I had to promise Huni, I'd stay off my cell. NOT working out so well, but he loves me-so it's not too bad of a problem. The real issue, is now Samy is addicted to my phone- uhoh! (which is also something Hunibuns doesn't approve of) Huni says, he paid so much for it, and Samy should not be anywhere near it. I have to agree with most of that- of course that's not what I said. My exact words were "But it has a cover and a protective screen!" LOL. Probably not the most mature answer, but we had a good little laugh ;)!

 Anyway, now that I'm OFF my iphone, much has happened since I last typed out. Of course if your a follwer of any of my social media sites (to your left), you know exactly whats been going on. I'd still like to share though! Ready for photos?? (even though they are not pretty, it's still fun to share right? Right. OK. So here we go..

First up my bee blocks I have a third, but forgot to photograph it. Boo. But happy I'm still in the game-two to go..


Second I learned how to make a wristlet key chain thingy, using echino laminate fabric (my new love)..


Next we have my very First Zipper Pouch using the Quilt-As-You-Go method. I made this for my dear friend Renee. (though it had to be a secret, heehee)..


Then I also made her this cute mini quilt. Which I'm totally proud of! (and totally sorry about the bright blue painters' tape)..


I also received my UK Vintage Sheet Swap Bundle. Oooo. LOVE! (check out the link to your left)..


Then I made my first drawstring bag using Jeni Bakers Lined Drawstring Bag (it waas Samy's, but Husband loved it so much, he kept it lol). Now I have to make another (but very excited to do so of course!)..


& Lastly, I made two uber cute quilt tops..

Scrappy Trip Along

Pixelated Heart
The trouble with these are, I can't for the life of me figure out what I want the backings and bindings to look like! Oh brother right? Either way, they are still cute, and as soon as I have that figured out? I'll see if I can muster up the courage to actually quilt them as well! The cupcakes were from a sweet friend Jocelyn, she's amazing ;D!

SO, there you have it! I have been busy sewing away, just too busy to share. Not Good. There, I said it. I'll do my very best to log on more often Loves!


Happy Valentines Day!
<3,
Veronica

1.11.2013

Double Flip HST BLOCK Tutorial

I'm part of my very first Quilting Bee :D. I'm totally excited! It's the 4x5 modern Quilt Bee, which consists of 3 Queen Bees and 9 Hives. The Queens Bees of this group are Amy Newbold (aka Sukie) of Sukie - Don't Ya Know Who I Am?,  Elizabeth Dackson of Don't Call Me Betsy, and Jessica Kelly of SewCraftyJess. This Winter Round is being hosted by Queen Bee - Elizabeth. SO cute we have "Queen Bees" & "Hives". LOVE that!

After grabbing a spot, thanks to Amy Newbold (aka Sukie) of Sukie - Don't Ya Know Who I Am? -Thank You Girl!- I had to choose a block and fabrics for my Hive. Well, I ended up adding so much stress to the whole thing, because I felt I had to pick the most difficult and most beautiful block on earth. Ridiculous! My husband had to point out that I should go with something I already knew how to put together. I Love that man ;). That's when it occurred to me HST -Half Square Triangles! I love these little guys. Especially after getting my confidence from following Jeni Bakers' Block Of The Month of In Color Order.

So after pour over blocks, blog by blog, suggestion after suggestion, I came across Elizabeth's tutorial on her Double Flip HTSs Mini Quilt. I loved it so much, I emailed her and asked how to shrink her entire mini quilt into a 12.5" block. I gave it go, and it turned out perfectly! Ready to finally see it?

TA-Daaa! I've had a few questions on how to put it together, and it's basically the same as Elizabeths'- we're just changing the measurements. Refer back to her tutorial if your unsure about anything. I'm not very good at giving instruction. So if you have any questions, contact me, and I'll get right back to you. Here goes nothing..

Instructions and Materials List for ONE Double Flip HST:

Clear Quilters Ruler
Rotary Cutter
Fabric Pencil/Pen
4.5" Print Square
4.5" Solid (neutral color) Square
3.5" Print Accent Fabric Square


 You'll need a total of 16 Double Flip HSTs to make ONE 12.5 Block. Ready? Let's get started :)

1. Grab your 4.5" Solid Square, and place it with the wrong side of the fabric facing up. Using your clear quilting ruler, draw a diagonal line from one corner to another. Do the exact same for your 3.5" Print Square and set it aside, we'll come back to it later.


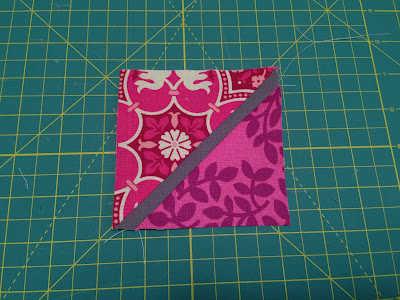
2. Take both Print & Solid 4.5" squares, right sides together, aligning them one on top of the other. Using a 1/4" Scant Seam, stitch next to the diagonal line on both sides. Creating two seams. It should look like this..


3. Next, place your ruler along the diagonal line you have drawn cutting into two separate pieces with your rotary cutter. Then press your seams open, and trim your block down to a 4" block.


(pretend the trimmed 4" block photo is here!)

4. Now, Place your 3.5" Print Accent Fabric Square on top of your Solid Square, lining up the corners. Make sure your diagonal line is parallel to the center seam. Next stitch right on top of your line.


5. Last, trim away the excess corner fabric, using a 1/4" seam allowance. Open, press, and square off down to a 3.5" block.


WOOP! You have just made one Double Flip Half Square Triangle Block!

Repeat for 15 additional squares. Arrange them in them in a diamond pattern. Like this..


Stitch your blocks together in rows from right to left, and then sew those rows together from top to bottom. Press..


PRESTO! Your now have one 12.5" Block ;D.

*I found if you want a particular color pattern, as I have here, it really pays off to plan and draw it out first. Your neutral fabric strip will end up on side of the block (on the accent fabric side). So plan your layout well. Otherwise, it's a really beautiful scrappy look!

I really hope you've enjoyed my first Bee Block Tutorial! Many many thanks to Elizabeth, and her wonderful instruction and ingenious mathematical skillz. Again, her tutorial was originally for a Mini Quilt - which can be found HERE. Please leave me a comment if you make one, and send me photos so that I can post them up! HAPPY FRIDAY EVERYONE ;D


<3,
Veronica

12.28.2012

Christmas Dinner

THIS JUST IN.. I just ran into some nice mans jeep.  :(  My truck wouldn't stop, it just kept on sliding no matter which way I turned those wheels. Stupid icy parking lot. I'll deal with that later.

In happier news, I am going to share our Christmas dinner. It was all last minute planning. Let me say Thank You to all of you who supported my little Shop and made this Christmas possible.SO here we go..

Our Christmas Dinner in Vintage Holiday & Opal Pyrex

Roasted Pepper Duck in a VP Poinsettia Pyrex Casserole and cradle
(which wasa missing a leg because Samy Boy couldn't wait ;D)

Raw Vegetable Salad in a VP Golden Pine SS

Creamy Garlic Mashed Potatoes in a VP Opal Bowl

Sauteed Onions and Jalapenos in my late Grandmothers China
(she would have loved that ;D)

Samy's Plate ;D

Our Plate w/a glass of Wine ;D

There you have it! It was so delish, and we had such a great time! Now to plan our New Years Dinner Menu ;D. Happy Holidays Everyone!
<3,
Veronica