After grabbing a spot, thanks to Amy Newbold (aka Sukie) of Sukie - Don't Ya Know Who I Am? -Thank You Girl!- I had to choose a block and fabrics for my Hive. Well, I ended up adding so much stress to the whole thing, because I felt I had to pick the most difficult and most beautiful block on earth. Ridiculous! My husband had to point out that I should go with something I already knew how to put together. I Love that man ;). That's when it occurred to me HST -Half Square Triangles! I love these little guys. Especially after getting my confidence from following Jeni Bakers' Block Of The Month of In Color Order.
So after pour over blocks, blog by blog, suggestion after suggestion, I came across Elizabeth's tutorial on her Double Flip HTSs Mini Quilt. I loved it so much, I emailed her and asked how to shrink her entire mini quilt into a 12.5" block. I gave it go, and it turned out perfectly! Ready to finally see it?
TA-Daaa! I've had a few questions on how to put it together, and it's basically the same as Elizabeths'- we're just changing the measurements. Refer back to her tutorial if your unsure about anything. I'm not very good at giving instruction. So if you have any questions, contact me, and I'll get right back to you. Here goes nothing..
Instructions and Materials List for ONE Double Flip HST:
Clear Quilters Ruler
Rotary Cutter
Fabric Pencil/Pen
4.5" Print Square
4.5" Solid (neutral color) Square
3.5" Print Accent Fabric Square
You'll need a total of 16 Double Flip HSTs to make ONE 12.5 Block. Ready? Let's get started :)
1. Grab your 4.5" Solid Square, and place it with the wrong side of the fabric facing up. Using your clear quilting ruler, draw a diagonal line from one corner to another. Do the exact same for your 3.5" Print Square and set it aside, we'll come back to it later.
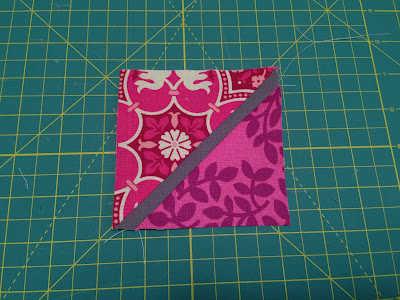
2. Take both Print & Solid 4.5" squares, right sides together, aligning them one on top of the other. Using a 1/4" Scant Seam, stitch next to the diagonal line on both sides. Creating two seams. It should look like this..
3. Next, place your ruler along the diagonal line you have drawn cutting into two separate pieces with your rotary cutter. Then press your seams open, and trim your block down to a 4" block.
(pretend the trimmed 4" block photo is here!)
4. Now, Place your 3.5" Print Accent Fabric Square on top of your Solid Square, lining up the corners. Make sure your diagonal line is parallel to the center seam. Next stitch right on top of your line.
5. Last, trim away the excess corner fabric, using a 1/4" seam allowance. Open, press, and square off down to a 3.5" block.
WOOP! You have just made one Double Flip Half Square Triangle Block!
Repeat for 15 additional squares. Arrange them in them in a diamond pattern. Like this..
Stitch your blocks together in rows from right to left, and then sew those rows together from top to bottom. Press..

PRESTO! Your now have one 12.5" Block ;D.
*I found if you want a particular color pattern, as I have here, it really pays off to plan and draw it out first. Your neutral fabric strip will end up on side of the block (on the accent fabric side). So plan your layout well. Otherwise, it's a really beautiful scrappy look!
I really hope you've enjoyed my first Bee Block Tutorial! Many many thanks to Elizabeth, and her wonderful instruction and ingenious mathematical skillz. Again, her tutorial was originally for a Mini Quilt - which can be found HERE. Please leave me a comment if you make one, and send me photos so that I can post them up! HAPPY FRIDAY EVERYONE ;D
<3,
Veronica


Great tutorial! I covet your block!
ReplyDeleteYou are doing AMAZING!!!
ReplyDelete