

It's a work in progress, and coming along nicely!
They aren't really hard to make, but it does help to practice. Once you got it down, you'll find yourself adding them into every project possible!
Forgive my plain boring photos for the tute (as well as my unsightly worn manicure), but I thought I'd do a demonstration. Especially since my current project is going to take me another couple of days. Apologies for any slight blurriness. I could not get my device to focus so close. Let's begin :).
French Knot Tutorial
I start with about 3 to 4 strands of embroidery floss. And thread my embroidery needle. Like this..

I favor Lecien COSMO Embroidery Floss, it's silky smooth. However, DMC is also wonderful, and readily available in a HUGE array of colors, almost everywhere :).
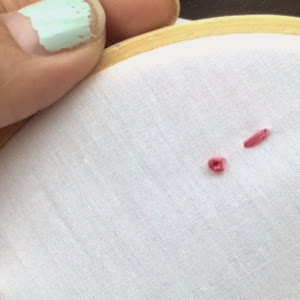
Secure the end of your floss with a small knot and thread it through to the front. Pull it all the way through until it catches. Grab the thread and wrap it around your needle three times..

Now this next part is a bit slippery. Holding your floss against the fabric, slowly slide your needle down until it's close to the top of your fabric. Then carefully pivot your needle tip right next to the hole where first thread came up from. Almost on top of it. Be sure you hold your floss taut (not to tight!) to keep it from unraveling! (also pay no attention to my chipped polish!)

Once you have it down, slowly push your needle down and out the back, still holding your floss.

Push and pull it all the way through to the back. And continue pulling your remaining thread...

When you get to the end, let go and slowly pull the rest through. Don't pull it too tight, as it will distort the knot. And...
See? Wasn't that easy peasy?! Now go practice your heart out!!! Feel free to ask questions, contact me, subscribe, all that jazz!!
No comments:
Post a Comment